|
0 Comments
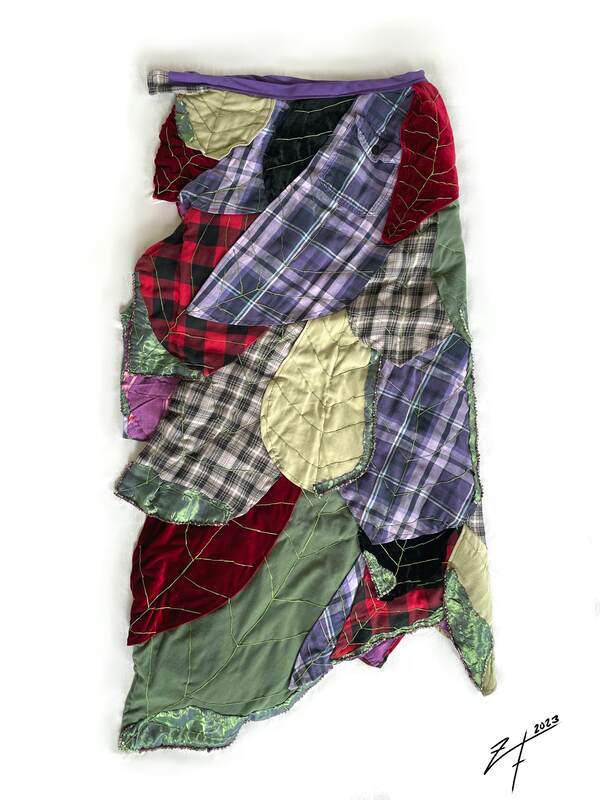
Instead of bothering making a pattern for the skirt portion of the dress, I ended up using my mock up as a base for the entire skirt. I’m glad I was able to use the mock up inside the actual garment itself because I feel like I wasted less fabric. The first step to actually making the skirt was to turn my scrap fabrics into leaf shapes, which I just did by eye at my sewing machine. I tried to get a mix of different sizes and shapes so that I could layer and get a nice organic texture from my fabric. I made the petals / leaves in batches, starting with the hardest, being the stretch velvet from old clothes that I had thrifted for myself. The second batch was my green stretchy stuff which included a shirt that was a hammy down from my father to my brother to me, a pair of leggings that I believe we’re hammy downs from my mother to my aunt to me, the last batch was all of the flannels which included a couple of flannels that I had gotten from my partner, as well as my own flannel that I wore every day religiously in college. All of these clothes were either full of holes no longer fit and or had massive staining. After all of the shapes were made, I pressed them flat and sort of made them into a pile so it be easier for me to create my collage on the base of the skirt To create a collage on the skirt, I placed petals with no real specific idea other than I wanted the shapes to radiate out from the side seem towards the open slit in the front side. I pinned all of the petals in place, and when I was happy with my final placement, I stitched some of them on using my machine and did the rest by hand. This was just to pin them in their permeant space. They were later more fully attached with embroidery. Before I got to the embroidery stage, I decided I wanted to add a little bit of the cabbage from the body’s portion, to help tied to the other, some of the textures that were happening in the top portion of the dress, because it felt a little disjointed to me. Because of the shape of everything, I had to hand stitch on those little pieces, which was incredibly finicky and difficult, and took way longer than I had expected. After that part was complete. I moved onto embroidering the entire garment. This is where my willpower was tested. I got about halfway through embroidering all of the leaf shapes onto the skirt when I ran out of embroidery floss and was sort of at a point where I kind of wanted to give up on embroidering the entire skirt. I thought about possibly attaching the rest of the petals with beadwork. After some consideration and flip-flopping, I decided to man up and actually buy more embroidery floss and finish embroidering the entirety of the skirt together. It was incredibly difficult and very challenging in the hot summer. Still, I pressed on to try to scrap together some lining. I couldn’t get a full lining from the remainder of my fabric, but I got enough where the interior section that would be seen mostly when the garment was worn looked nice and clean. In retrospect the skirt is so busy I do wonder if the beadwork gets lost in the details. Even if you can’t see the individual portions, I do think that in the end, it added some thing extra and the garment does look nicer from a distance even if you can’t tell exactly what is happening. Finished Skirt Fit Test Shots
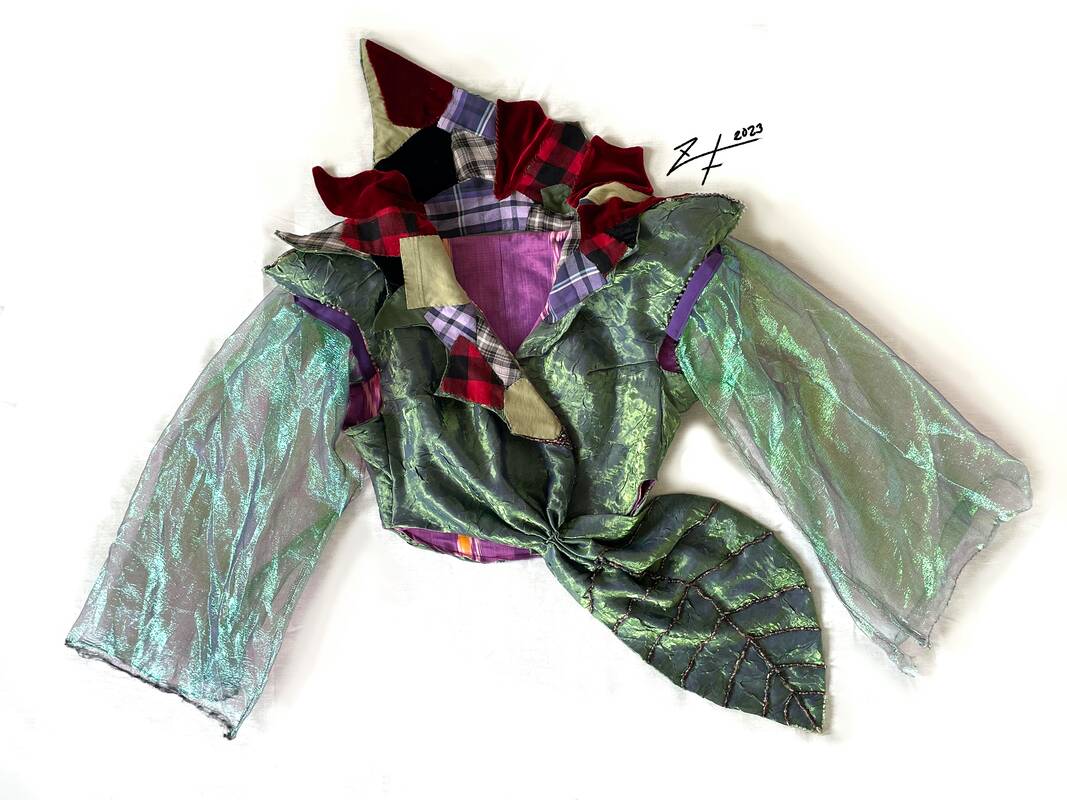
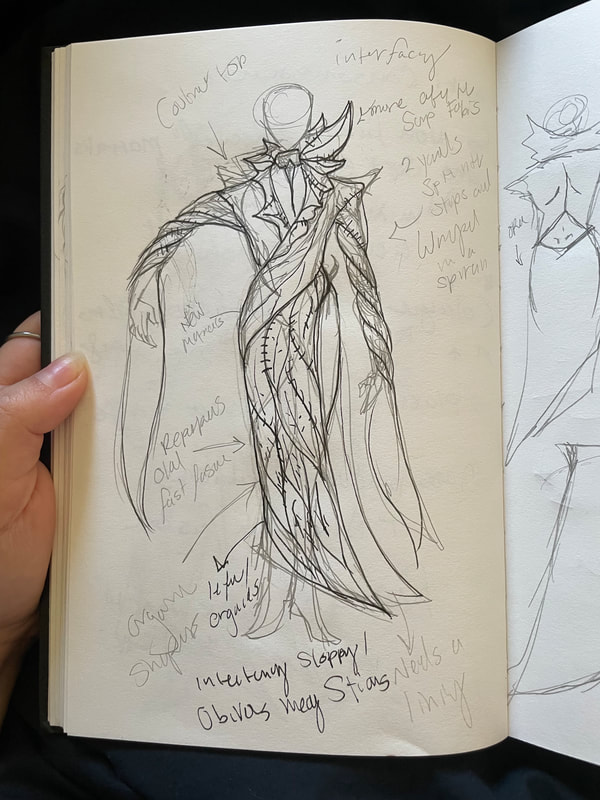
The bodice started with me, cutting out the fashion fabric with the pattern that I had made (seen previously in my post about my pattern making mock up process). I didn’t record the construction of the base of the bodice because I genuinely just got into the zone. In my process, I realized that my fashion fabric was far too flimsy and thin in order to hold its shape, so I ended up using the pattern pieces from my mock up to reinforce the stability of the garment. I then cut out the same exact pattern for the bodice in my lining fabric. I stitch together that lining with the intention of bag lining the full body. After I made my lining, I realized that the way that I had stitched the inter-lining of the garment was really flimsy so I decided to sit down and hand pad stitch the interlining fabric into the garment. This was where I realized that this garment was going to include far more hand stitching than I wanted it to, and you will see going through this further just how much hand stitching ended up going into this garment. After I pad-stitched all of the construction layers on, I got to the part of actually creating the pocket to hold the stuffing up for the shoulder pads because the shoulder pads needed extra support. You can see that there was a pretty huge difference between adding that construction portion to the shoulders. With the collar I used a different technique of patterning. I actually didn’t even bother cutting out the pattern from the fashion fabric because it was such a finicky shape. What I ended up doing was I overlaid the interlining of the collar onto the fashion fabric, and then cut and stitched fabric around that interlining layer. For the little inserts of it, I used the stiffer interlining layer as a baseline pattern, I didn’t bother to do the same technique as I did with the larger portion of the collar. They looked very funny before I pressed them they kind of are poofy like stuffed animals, but after pressing them they were nice and flat. Once I finished attaching the outside fashion fabric to the collar, I used all of the small pieces of scraps and cabbage from the skirt pieces being made to create the collage inner portion of the collar. Because of how tiny each one of the pieces were, and how they needed to be stitched onto the final piece, I had to hand stitch the entirety of the collar together. After the inner collar was stitched all the way together I added the little insert pieces (also by hand) to the body. After the shoulders and collar were fully attached to the garment I added in the bag lining What’s all of those construction portions of the bodice were completed, I moved onto making the sleeves of the dress. I completely changed my original plan for the sleeves because I realized the fabric I purchased was incredibly flowy and I wanted to show off the fabrics quality. the movement potential of the fabric would have been diminished by my original idea, which was to create these tight wrap selves. Instead, I ended up making these really super simple squares of fabric that were basically designed to just be open at the top so that they didn’t catch on the under arm. I wrap them in bias tape at the top part where they connected to the sleeve. Then later, when I started to embellish the bodice attached the sleeves with bead work, so it looks like they are floating there with the beads attaching them to the shoulder. This detail is the part of this garment that I particularly like the most. Then it was time to move on to doing the beadwork, which is typically my favorite part of any sort of garment construction. I think of beadworking as my treat for a job well done in a certain way. I create the embellishment of the illusion of a leaf shape on the part of the garment that kind of tied the top to the skirt. And so I just on by one attached beads in my embroidery pattern, again completely eyeballing it the way that I am one to do, with some slight markings of where I wanted the anchor points for the veins in the leaf to land. Once I had finished that part, I finished the shaping of the part of the bodice section that was designed to close around the body, and I also made that portion hold together with floating beats. Once I finished the leaf part of the garment, I added some extra beads to the shoulder pads and the front portion of the collar that peaked out when you close the front. I added some closures, which I ultimately ended up getting rid of because I didn’t like the way that they fell on the body when I finally did my photo shoot and displayed the piece in the galler,y but that was the final step in creating the bodice portion of this dress Completed Bodice Fit Test ShotsAfter I figured out how the general shape of my final garment was going to look, I began trying to figure out the best shape of pattern to create that three-dimensional shape. The way that I figure out pattern pieces is a physically try to flatten the 3D shape of the final garment in my mind and cut up that design essentially into smaller parts. Once I’ve flattened out the pieces into a shape that looks like it will roughly translate back into the 3D space the way I want it to be, I take measurements of my body and apply that to the abstract shapes that I’ve created. Please keep in mind I’m enterly self taught when it comes to sewing! I went through a couple iterations of possible pattern pieces in both in my sketchbook, and then in my notebook. I knew that this was going to be a slightly more complicated pattern and this is the first time I was ever creating a collar for a piece without a pre-existing pattern, so I decided to make a mock up against my personal wishes. I hate making mock ups, but they are often very necessary in order to really understand the shapes of your garment especially when you’re working with more unique designs then you are used to. My mock up needed some slight alterations from my original pattern piece, but genuinely nothing major. It helped me figure out sleeve placements and where I needed to put darts in order for the government to fit over the constructive undergarments. I also figured out where I need to add more fabric to the caller in order for it to lay flat and got a better idea of where the skirt needed to sit. Once I was happy with my mock up, I cut it apart, laid it on top of some brown butcher paper, and trace around it to create my pattern. I genuinely cannot remember the exact measurement of the seem allowance that I added to it. I typically eyeball my seem allowance because I do not pay attention to the measurements on my sewing machine when I am in the zone. Most of my measurements are based off of eyeballing typically, because of my ability to render objects in three dimensions, pretty faithfully inside my mind. I’ve never had any fit issues due to eyeballing. This is not advice. This is just a skill that I personally possess, and I cannot figure out how to teach other people how to do it.
Anyway, I’ve included images of my pattern pieces below, if you would like to try to make your own version of the dress, but as I stated previously, there aren’t really any measurements attached to these pattern pieces.
Another element that influenced my design was that I had already pre-picked the fabrics that I was going to use to create the collage portion of the peace. I purchased my fashion fabrics with that palette in mind to sort of complement and tie together both my old and new materials. This is one of my first times purchasing synthetic fabric for a project and I don’t know if I would do it again, but it was an interesting experience. I’m fairly allergic to polyester so working with the sheer synthetic fabric was particularly challenging for me because I was having some issues with it burning my hands while sewing. Alas, that is the price you pay when you pick your fabric based on ‘Ooh pretty!’ factor.
|
Works for “Kaleidoscope: A Master Class in Collage”See here the making of the Collage Dress as well as image of it and the companion poem tapestry made from the same materials Categories |


